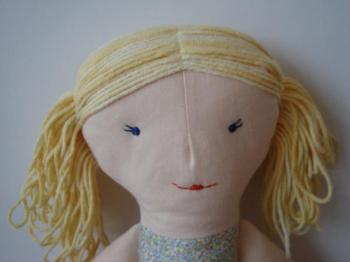
Part 1: how to sew girls hair : pigtails
I want to show you how I make doll’s hair out of knitting yarn.

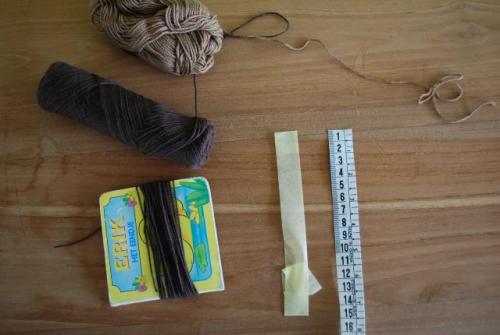
First you need to draw a line on your doll’s head, starting from her forehead all the way over her head to her neckline where you want the hair to end. Measure that line (e.g. 15 cm). Then take some Scotch tape (= the same length as the line you’ve just measured) and put it with the adhesive strip up on your table.

Now measure how long you want the hair to be, e.g. from her left shoulder straight up over her head to her right shoulder (26 cm in this example).


Now place the yarn one thread at a time on the tape (don’t cut them!), as shown in the picture. Make sure they lie neatly next to one another.


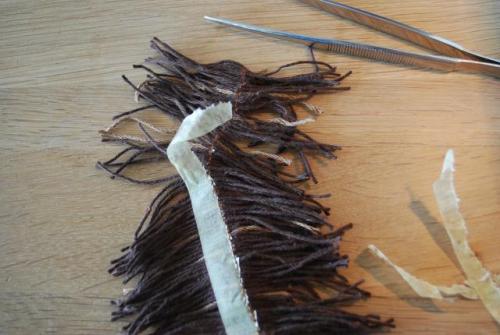
Place a piece of paper tissue (I’ve used toilet paper) on top of the centre line.
Carefully turn everything around and start sewing over the tape with the paper tissue at the bottom. (Use little stitches!)

Remove the tape and the tissue. Do this very slowly and with extreme care to avoid moving any hair. You might want to use tweezers for this.


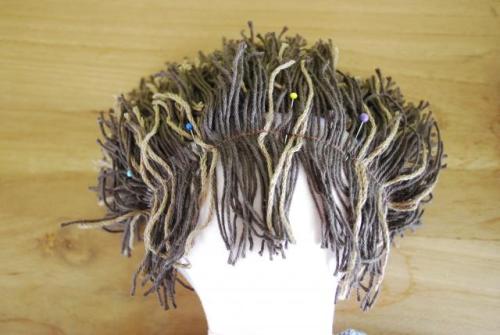
Place this ‘wig’ on the line you’ve drawn earlier on your doll’s head. Make sure you keep the right and left side separated so the stitched line is still visible. Now pin and sew it manually in place, starting from the forehead and ending at the neckline.

Once you’re done with this, you can use some fabric glue to keep the hair in place if desired.

Now draw a line on both sides of the doll’s head, as shown in the picture.


Take the first 4 threads and sew them on this line. Then take the next 4 threads and do exactly the same.


Repeat this until all threads are sewn in place.

There she is: one side is already sewn in place.


Once you’ve done both sides you can make pigtails and sew on a nice ribbon to render the stitches invisible!

You can make all kinds of hair using this method. You could make bangs (in this case you have to sew very short threads of yarn on the Scotch tape and sew it on top of the doll’s head before you sew the long hair!). Or you could use ‘ribbon-yarn’ or strips of fabric. I guess I must try that one out on my next doll.
part II: how to sew boys hair
For the boys I use the same method, but I sew the wigs in another direction on the head. Because you need more wigs, to cover the head completely, I use a quicker method to sew the wigs. This is how it goes:
1. Measure the dolls head from ear to ear (over the back of the head). This is the length of tape you need. I use no longer the Scotch tape, but I use masking tape, which is less strong, and easily to remove from the yarn. Also important: you can sew right onto this tape and there is no need for tissue paper any more.
2. the length of the yarn = 2x the length of the desired hair. For a boy I usually take 5cm, so you need to cut threads of 10cm. As you see on the picture, I use a little book for quick and easy cutting the yarn. Now place the yarn one thread at a time on the tape. Make sure they lie neatly next to one another.

3. Start sewing over the yarn with the tape at the bottom. Use little stitches, and press the yarn down with your fingers so it won’t get stuck under your presserfoot.

4. Remove the tape. Do this very slowly and with extreme care to avoid moving any hair. You might want to use tweezers for this.
5. Place this ‘wig’ horizontally on the backside of your doll’s head. Now pin and sew it manually over the stitched line of your wig. When you’ve done this, you fold the hair down and the first row of hair is done.


6. You make as many of these wigs as you need and sew them at 1cm above eachother on the dolls head. Make sure you sew the last one a little over the seam of the head (which means: on the forehead). Notice: the shorter the hair, the more wigs you need. This is how it looks before the haircut:

7. And this is after the haircut:

8. You can use this method also for a girl with loose hair. For example, the last ‘wig’ of this girl is sewn not at the center of the threads, but a few cm on the right side:


Hi, Tonte – I am making my first rag doll, just making it up as I go along, but really needed some help for adding hair. Thank you for this clear, well illustrated tutorial. (I had a Tonte Jo who made pajamas for all the children in the family)
LikeLike
Awesome tutorial! Thanks so much for posting it! Maybe this was already mentioned, but I found using Painters’ Tape worked the same as masking tape, but since it is not as sticky as masking tape, it’s easier to remove after the wig has been sewn.
LikeLike
Woah! I’m really digging the template/theme of this site. It’s simple, yet effective. A lot of times it’s difficult to get that “perfect balance” between superb usability and visual appearance. I must say you’ve done a amazing job with this. In addition, the blog loads extremely quick for me on Safari. Exceptional Blog!
LikeLike
I was looking for a hair tutorial. Thanks for sharing. I've just started doing rag dolls, so far I have used felted hair, but now I decided to make one with wool and I was not sure how to do it. Thanks for sharing 🙂
LikeLike
Thank you for this tutorial
LikeLike
Thank you very much for sharing. This tutorial is great!
LikeLike
Great tutorial. I do a bit different – but with similar effect 🙂 See at my site
Kukliki
LikeLike
Hello everyone! I made a mistake. I made this hair for my crocheted doll and you can find the doll here:www.artlocarftsmiami.blogspot.com. Thank you and sorry for the confusion!
LikeLike
THANK YOU SO MUCH, I HAVE LOST SLEEP WONDERING HOW TO DO BOYS HAIR FOR RAG DOLLS AND NOW I KNOW. REGARDS ANNA
LikeLike
Thank you so much. I made a rag doll for my little sister who is turning 5 years old, and had no idea how to make hair. But this helped me so much. Her party is today and i can't wait for her to open my present. ❤ ❤ ❤
LikeLike
Hoy he encontrado este maravilloso tutorial, muchas gracias, está muy bien explicado y fotgrafiado, lo andaba buscando tiempo. Repito, muchas gracias
Maria Antonia
LikeLike
Que bueno que la encontre,estaba buscando como hacer el pelo a un muñequito y aqui esta.gracias por su aporte .ya se donde encontrar cosas fabulosas…
LikeLike
So thoughtful to share–beautiful dolls! Thank you very much! 🙂
LikeLike
So thoughtful to share–beautiful dolls! Thank you very much!
LikeLike
I’m from America
Thank you very much benefited greatly enjoyed very
LikeLike
I love dolls since I was small
LikeLike
This is wonderful. I am actually using your instructions to make a wig for a costume. After three failed attempts finding your method is going to save my costume.
LikeLike
Pretty dolls and very good idea for hair sewing !
LikeLike
Pretty dolls and very good idea for hair sewing.
LikeLike
My english is not very good….
LikeLike
Thanks for the very clear and simple instruction on how to sew on dolls hair
on some dolls that I have made and I have used ur method to apply the hair on the doll.
One question how to u cut boy hair in a way that when done it looks like a boy doll thanks. U know thst u show us a before and after the haircut but cud I see photo of the actual cutting process thanks acualuttinpriceess
LikeLike
This is by far the best method of sewing on doll hair. I was going to knot each piece but I knew it would take forever. The only problem I had was that I think my tape was to sticky and it was hard to get the yarn off…a little licking helped, love the taste of yarn and tape:) Thank you for providing this tutorial. It’s been bookmarked.
LikeLike
Awesome tutorial!
LikeLike
Thank you so much. This was the best doll hair tutorial I have ever seen. Much easier than the way I was doing it.
LikeLike
Thank you very much for sharing. This tutorial is great!
LikeLike
I just finished a raggety ann doll and instead of using tape(the first hair was a disaster) I used my tear away stabilizer that I use when I machine embroidery. Worked like a charm.
LikeLike
Pretty dolls and very good idea for hair sewing.
LikeLike
Thank you so much! You must be some sort of instructor because you explained this so well even I feel confident about trying this! I have MS and have some cognitive deficiencies so I know good instructions hen I see them. Bless you!
LikeLike
Very helpful. Just what I needed to know. Thank you! 🙂
LikeLike
Thank you so very much for this tutorial! I have just started making dolls and “hair” has been one of the most difficult tasks for me. I used your method and am so very pleased with the results!
LikeLike
Rather than using tape to secure the hair down when you sew that middle line of the hair, just use strip of the water soluble stabilizer (used in machine embroidery on top of fleece and towels to “lift” the stitches out of towels, etc.). When you are done, you simply wet the water soluble fabric and it disappears. There is no “pulling out your hair out” with this technique! 🙂
LikeLike
Wonderful tutorial! My boy doll is looking good. Almost done. Then the haircut. Lol. Thank you.
LikeLike